Recently, I got this email in my inbox:
I am a 14 year old girl. I currently wear some makeup, but I would like to find some better cosmetics and wear a little more.
Unfortunately, I don’t know where to start. I can’t go to my mom for help, because she is one of those people that never wears makeup, but when she does it is a very minimal amount of expensive Clinique foundation. I can’t get help from my friends either, because their parents buy them very high-end and expensive makeup, which I can’t afford.
So I’m looking to you for help. I’m a huge fan of your blog and I think that you might me able to help me. I’m looking for some makeup that I can buy myself. It doesn’t need to be super cheap, just affordable. I’m looking to be able to create a natural, everyday look, and be able to get to a full face of makeup for nicer occasions. I would really like a foundation/BB cream/Tinted moisturizer, blush, bronzer, highlight, concealer, eyeshadow, eyeliner, mascara, lipstick/lip butter/lipgloss, and any needed tools. And maybe a few splurge-worthy items that are more expensive.
I have medium brown hair, grey-green eyes, and fair skin with an olive undertone. I also have a square face, hooded (but not Asian) eyes, and cheeks that are very round and look like they have no cheekbone. Near me, I have a Walgreens, Rite-Aid, CVS, and an Ulta. Farther away I have a Sephora. I would prefer to stay at about $75 or less in total, but it would be completely fine to be over that price.
I would really appreciate any products or advice you could give me. I truly am lost when it comes to makeup. I’d really appreciate it though if you could tell me an affordable eyeliner that doesn’t smudge. I’ve had a lot of problems finding one.
Thank you so much. You have no idea how much this would mean to me.
So, I have to say that this challenge really excited me! I have this secret fantasy of helping all the girls in my life with their first makeup. I have no idea why, it just sounds like so much fun!
The author of this email (who asked to not be named, though let’s just call her Karen to make it a bit easier), is right in the middle of that difficult period in which she wants to grow up and look older, but doing too much not only freaks out the parents, but it can just look…wrong. It’s a really fine line to navigate, and if you go a bit overboard you’ll become known as the girl that just tries too hard. That’s definitely worse than having a more natural look that just accentuates your positives and makes you look pretty. Luckily Karen seems to realize that!
My ideal look for this age group is pretty minimal. You should wear as little face makeup as possible, often your skin is the envy of all the women around you, so covering it up isn’t necessary and just looks too artificial. Keeping the shine down without looking like you are wearing a mask is pretty easy if you have the right products, and just adding a little color to lips and putting the emphasis on your eyes keeps your look age appropriate and pretty.
Here’s a look at what my picks would be for Karen. Note that I’m just including prices (I priced things out at my local Target, but you can buy many of these items at drugstores and ULTA), not a total. I offered a few options for products in the pics, and there’s more mentioned below.
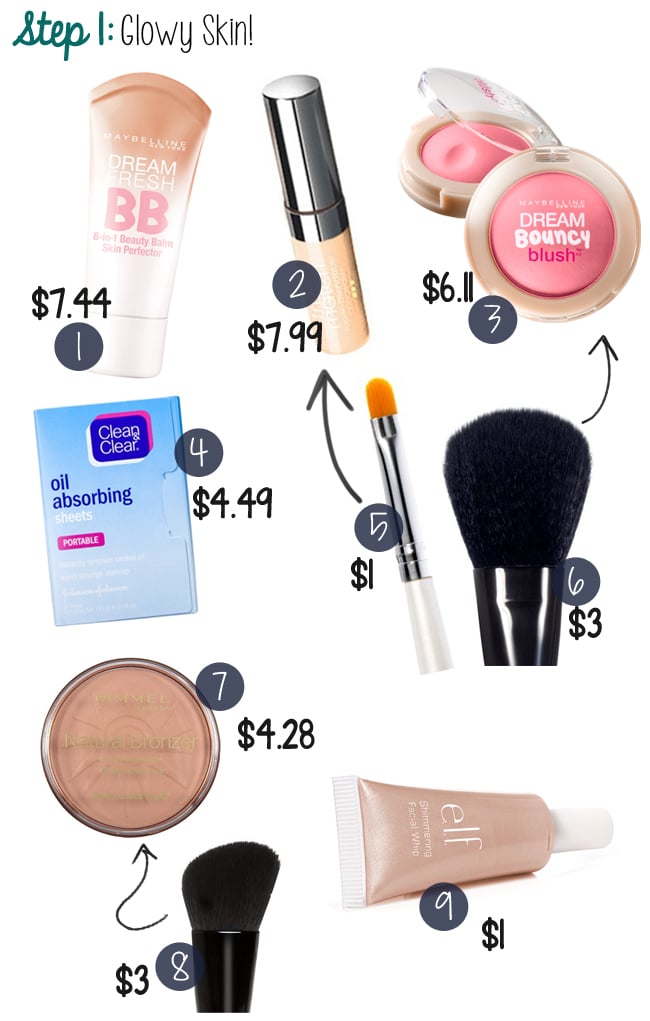
1. Dream Fresh BB Cream: Karen requested a BB Cream, and I actually hadn’t tried out this one from Maybelline yet! I know, everyone else in the world raves about it (and I will too in an upcoming review), so I grabbed a tube while I was pricing other recommendations. This BB Cream is lightweight, offers SPF 30 and has light coverage that can be built up easily with a 2nd layer. It kind of sinks into your skin and blends really well, it basically looks like you have naked and perfect skin!
The only issue I have with the BB Cream is that because it is also your moisturizer, you pretty much need to apply it every where, every day. If Karen needs more flexibility, I would go with a regular lightweight SPF lotion and then use Neutrogena Healthy Skin Enhancer in areas that need a little coverage. This is slightly lighter coverage than the BB Cream, but it would be easier to use only as needed.
2. True Match Concealer: I love how many shades are available in this concealer. Its light consistency means that it not only works under the eye area (though Karen shouldn’t really need it there), but it is great over blemishes too.
3. Dream Bouncy Blush: I’m a big fan of cream blush this season, and the glowy/pretty effect you’ll get from it is perfect for a teen trying to show off her skin. I would go for pink with Fresh Pink 05 or Pink Plum 40.
4. Clean and Clear Oil Absorbing Sheets: Strangely enough, these are hard to find “official” info on, but they are definitely still for sale at my local CVS and Target. I would avoid powder (again, keep skin looking as fresh as possible). A few minutes after applying BB Cream, Concealer and blush I would blot gently with a regular kleenex. This will remove some of the oils from the products and give a more natural finish. As needed, blot again with these sheets throughout the day. They’re blue plastic and won’t leave any residue behind, instead they remove your oil and freshen up makeup a bit.
If you find that you really must have a powder to set everything, I’d go with the ELF High Definition Powder, which is a low cost dupe of the Make Up For Ever HD powder.
5. ELF Concealer Brush: I think the best way to cover up a blemish is with a liquid concealer (see #2) and a decent brush. I have 2 that I like, the other costs over $20. Dab a little on the blemish itself, then grab this brush and just brush all over the place. Gone!
6. ELF Complexion Brush: I really prefer the look of cream blush that was applied with a brush. I use a super old Clinique brush that my mom got with a gift with purchase. I can’t get another one, I haven’t found anything like it. This $3 brush is pretty close. Smile to find the perfect spot to apply it, dab a few times on the apple of your cheeks (don’t get too close to your nose, let there be at least 1 1/2 finger widths between the edge of your nose and your blush), and put a little in almost a “tail” going back toward your hair line. Easy!
7. Rimmel Natural Bronzer: Matte, not orange, cheap and you get a lot (and it lasts for hours), definitely my favorite inexpensive bronzer!
8. ELF Studio Angled Blush Brush: It sounded like Karen is interested in doing a little contouring with the bronzer, and this blush is a good size to do that.
9. ELF Shimmering Facial Whip: If there was a lifetime achievement award for inexpensive facial highlighter, this ELF Facial Whip would win it! It’s cheap and comes in a lot of shades, but be careful! There’s a lot of shimmer in this product. Don’t confuse highlighting with good skin, it’s really easy to use too much Facial Whip and just look like one big shimmer person. Here’s a good post about using ELF Facial Whips to highlight.
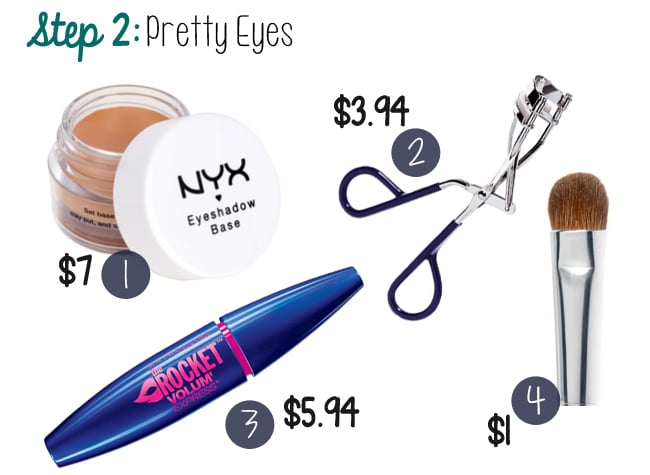
1. NYX Eye Shadow Base: Eye shadow base/primer is a really big deal for your look. I love this one from NYX, I apply it quickly with my fingers and it covers up any visible blood vessels (which means that my look is much more pulled together) and keeps my eye shadow looking fresh and just around all day long. I’ve had the same pot of this stuff for about 18 months easily and it’s only about half way gone despite using it almost every day. $7 well spent!
2. Maybelline Eye Lash Curler: It does look like a torture device, but learning to use one of these things can make a big difference in how your eyes look! I used the CoverGirl curler for forever, only upgrading in the last year or so. CoverGirl no longer makes it, Maybelline and Revlon both have decent ones. (Don’t try to save a few dollars and get the ELF version.)
3. Maybelline Volum’ Express The Rocket Mascara: Lots of volume, it holds a curl, no flaking or smudging… very good!
4. ELF Eye Shadow Brush: This is one of the best eye shadow brushes out there. I have a huge collection of much more expensive brushes, but I still own about 6 of these and use them every day!
A note about eye brows!
I purposefully didn’t include eye brow products here. I can’t tell you how many girls I know that over plucked or plucked their brows strangely as a teenager and now they are stuck. Really and truly, their brows won’t grow back and they are stuck pencilling things in, which looks really odd. It is much better to seek professional help with your brows or do the bare minimum on your own now so that you have better eye brows for decades (literally) to come.
If you’re going to do anything to your brows, I would pluck only stray hairs that aren’t part of the main brow (and are only under or between your brows, nothing on top), don’t try to change the shape at all. No one wants to accidentally have tadpole eye brows for life! If your brows are a bit unruly, go for a clear brow gel. My favorite is from Anastasia and is a bit expensive, but you could also use a clear mascara (CoverGirl makes a good one).
I don’t have green eyes (I have brown), but the colors that work for both are fairly similar. The key to green eyes is that while you still pull out accents from within your eye color or go completely opposite on the color wheel (hello purple!), green eyes can get easily overwhelmed with colors that are too dark. Black eye liner in particular is too harsh. Swap to brown, bronze or dark grey and your eyes will pop! For shadows you should go for pretty browns, tans, golds (to pull out gold flecks from your eyes), greys or purples. You can try greens depending on the shade, but it might clash with your own green.
I found some great articles about green eye makeup:
Beauty Tricks
eHow
Allure
I’ve shown a lot of great shadow options that work with green eyes, but really, there are many more out there! I’ve had the best luck with eye shadows from L’Oreal, Maybelline, CoverGirl and Wet ‘n Wild.
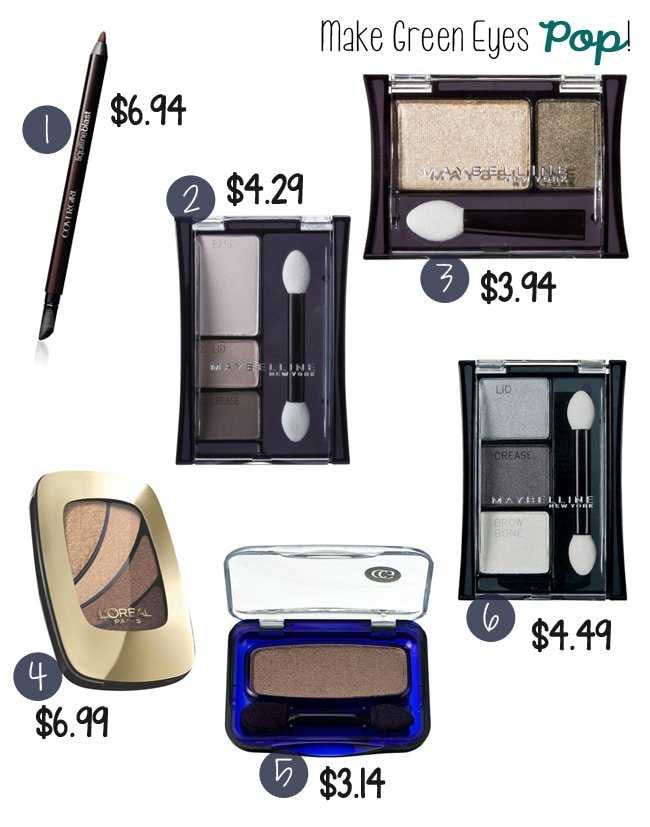
1. Liquiline Blast Eyeliner: Super pigmented, easy to work with, and I love the smudge end. Go for the brown, dark grey or purple.
2. Maybelline Expert Wear Shadow Trio in Almond Satin
3. Maybelline Expert Wear Shadow Duo in Sunkissed Olive
4. L’Oreal Colour Riche Shadow Quads in Because I’m Worth It
5. CoverGirl Eye Enhancers 1-Kit Shadows in Tapestry Taupe
6. Maybelline Expert Wear Trios in Impeccable Greys
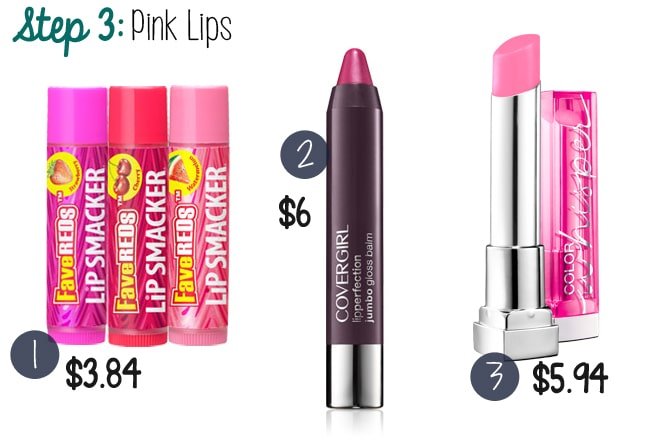
1. Lip Smacker Starburst FaveREDS Trio: I swear I probably had about 40 Lip Smackers when I was in high school. This trio was recently recommended to me by a makeup artist, so I’m planning to pick it up! They have a subtle red hint, which means they’ll be perfect to just keep in a jeans pocket and apply any time.
2. CoverGirl LipPerfection Jumbo Gloss Balm: This pencil balm comes in a lot of different colors but they’re all soft, pretty and hydrating. It’s a little more color than #1.
3. Maybelline Color Whisper: I think about the same pigmentation level as #2, though it depends on the shade. I think the key is finding a color that offers a little more color than your natural lips but is still translucent.
Did I miss anything? Let me know what other products would be worth recommending to Karen!
I’ve enlisted some friends to make their own inexpensive makeup kit as well. There will be a new one each day!

 I’m a doctor, a mommy and a bit of a beauty addict. If you let me, I can take 2 hours to get ready in the morning. Really. I'm on a quest for faster beauty that works!
I have to say I HATE that Dream Bouncy Blush. I bought some when I was stranded out of town without my makeup and I found the application challenging and the effect underwhelming.
Great recommendations! I definitely enjoy ELF products.
What kind of eyelash curler did you upgrade to? I love your list! I'm going to share it with my teen daughter 🙂
I'm so jealous someone asked you this! I am also obsessed with being everyone's first makeup advice! LOL. I second your recommendation of Tapestry Taupe. It is one of the best shades ever! I also absolutely HATE the ELF eyelash curler, with a fiery passion. I saw it recommended by quite a few beauty bloggers so I picked it up. Hate.
WOW I cannot believe the price difference to makeup here in Australia Loreal is so expensive I would say that concealer would be nearly $20 and also the Maybelline eyeshades are over $10.
Please check out my blog http://www.corynleebeauty.blogspot.com.au
I would recommend the Maybelline Color Tattoo in Bad to the Bronze for a quick eye look that can be applied with fingers. If you have unruly eyebrows, they can be carefully trimmed with a tiny pair of scissors (I have some from Tweezerman). And definitely keep an eye out for sales and coupons!
KEEP all your receipts and clip coupons! The stores Karen listed all have good return policies and many have great coupons! So if something doesn't work, you can return it.
My product suggestions:
Maybelline Full n Soft Mascara in Black: this is a good starter mascara bc lashes won't feel crunchy with this–it will FEEL soft to the touch and hence, comfortable to wear for first-time users. Holds curl, natural volume and won't flake.
Eyeliners for Hooded Eyes that won't smudge:
-Rimmel Scandaleyes Waterproof Gel Liner
-L'Oreal Infallible Lacquer Gel Liner
-Revlon Colorstay Pencil Liner: (twist-up pencil–this will fade but won't smudge all-over so I just reapply later in the day)
-Kat Von D Tattoo Liner (liquid)
-Milani Ultra-fine Liquid Liner
Eyeliner tips:
1. Applying liner on top of eyeshadow primer might help liner last longer. The NYX shadow base won't do it for me. Urban Decay Primer Potion works best on me (but I can't use it since I'm allergic). Milani primer, I hear, is very good.
2. Setting cream/gel/pencil liner with powder eyeshadow in a matching color might help it last longer too. I like L'Oreal Infallible Eyeshadow for this bc there is no fall-out if I remember to tap off the brush.
3. A fine-tipped black liquid liner is excellent for hooded eyes bc the right formula won't budge once it dries and sets but the downside is that it's so easy to overdo. DON'T draw thick lines and DON'T wing out the liner (too retro housewife-looking: people WILL shudder in horror). DO draw on the liner as thin as possible on the lash line to look naturally defined. Use a bunch of tiny small strokes–there's no need to line the entire eye in one stroke. My friends with blue or green eyes do this and when done right, it just looks like they have thick lashes.
If I ever get my act together to write for you on this, my first suggestion is to join the CVS reward club and the beauty club. You get better prices and money back towards more shopping trips.
I love your post. I cannot wait for my niece to become a teenager so that I can buy her first makeup products for her!
I really do not like the BB Cream from Maybellne, it creates a cake finish on your skin…Beware!
Really? That's totally different than the experience I had! It is a bit more coverage that other BB Creams out there, but it went on very smoothly for me and lasted all day.