One of my must have, desert island beauty products is mascara. Really. I know it is strange, but I just feel like my eyes are naked without it! It’s the last thing I put on during my makeup routine, and I feel like it just makes me look much more pulled together and complete.
Over the years I’ve found that there are tricks to putting on mascara and getting the long, lush lashes we all want. And while you can definitely just use false eye lashes, I don’t think that’s a great option for normal, every day use. Have you ever seen someone at the grocery store with false lashes? Yeah… it can be a bit out of place.
So, I like to make the most out of my mascara! I shared a lot of mascara tips in my Faking Falsies: The Ultimate Guide to Amazing (and Real) Lashes! Post, but I thought I’d go through step by step exactly how I apply mascara, and show you a few new tips that I’ve picked up along the way.
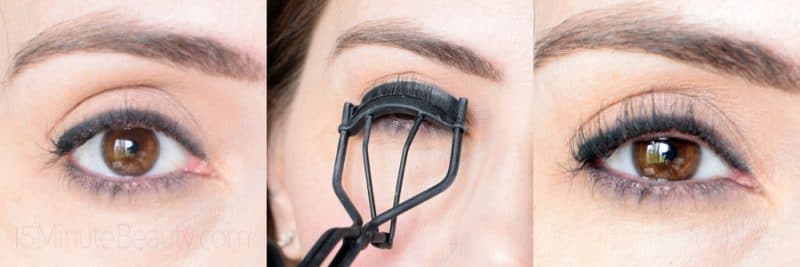
First, I always curl my lashes first. Mascara looks much better and my lashes longer if my lashes start out curled.
I’ve found that splurging on a good eyelash curler is definitely well worth it! Even the “more expensive” drugstore ones are a bit wonky, and you can get a lash stuck in the ends of the curler. That really, really hurts! A quality lash curler will last years, won’t grab your lashes so they can be pulled out, and the results will last much longer. Lately I’ve been loving the Surratt Beauty Relevée Lash Curler, you can check out my Surratt Beauty Relevée Lash Curler review or buy it from Sephora.
When I curl my lashes, I put the curler down right next to the base of my lashes, and squeeze. Then I’ll pull it out a little, maybe a few millimeters, and squeeze again. This second squeeze is my “big” squeeze, longer and harder. I also pull out my hand a little while I squeeze, so it pulls the curler away from my lid some. Then I pull it out a third time and do another little squeeze. This is just my own particular pattern, but I really have found that squeezing in more than 1 location, as well as that little pull away trick, can make a big difference in how the curl looks and how long it lasts.
Next, it’s time to start with mascara #1. I layer 2 mascaras, and deciding which ones I want and what order to apply them is a whole process, that will be a separate post for tomorrow. I promise! In the meantime, this is my first mascara. I’m using Chanel Le Volume here.
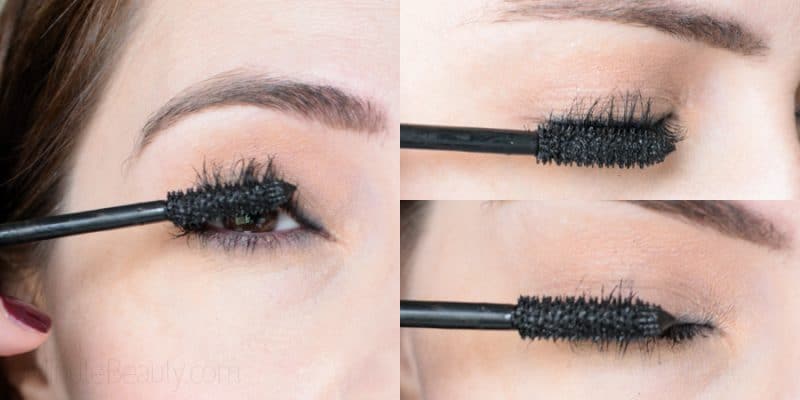
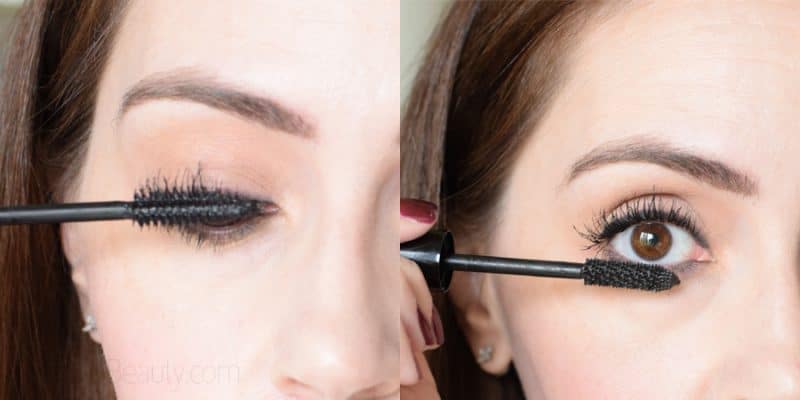
On the left, you can see that I start applying the mascara at the very base of my lashes, putting the brush as close to the base of my lashes as I can. I move the brush back and forth, wiggling my lashes around as I apply mascara. The goal is to get the mascara at the very base of my lashes, I don’t actually pull the brush out towards the tips of my lashes at all. I just wiggle the brush along the base of my lashes.
Now on the right there are 2 views of how it looks when I start to apply out to tips of my lashes. Normally I can wiggle and pull out the brush to the tips of my lashes. However, with such a bristle packed brush that doesn’t work. The lashes will just skim along the top of the brush and barely any product gets applied.
To overcome this issue, I blink into the wand. Holding the wand out just a little from where I was wiggling it into the base of my lashes. I hold the brush still and just blink my eyes. Surprisingly, this will actually force the lashes down into the brush much more than if I was moving the brush! I just blink into the brush a few times, making sure to pull the brush out a little once I’ve blinked in, this ensures that the tips of my lashes have mascara on them as well.
So, wiggle, then pull the wand away a little bit, and blink into the wand. If you didn’t reach the tips of your lashes, then you can pull the wand through the end a bit.
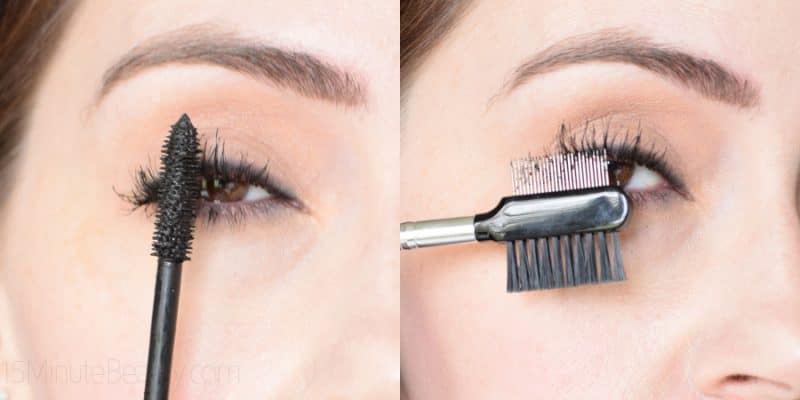
To add a little more definition to your lashes, you can also hold the wand vertically as shown, and apply the mascara that way. I move the brush upwards when I use it this way, sweeping the brush from about mid-shaft on my lash through to the ends.
After all of that mascara application, it is pretty easy to understand if your lashes look clumpy or are sticking together quite a bit. I like to keep a metal lash comb on hand to get rid of clumps. I just comb through trouble spots and separate big groups of lashes that are stuck together. I’ve heard various recs about when to do this, to dry mascara, to wet mascara, after every coat of mascara or at the very end… I do it after mascara #1 and at the very end. I also do it while my mascara is still wet, I’ve found that I can’t pull apart clumps of lashes very easily if the mascara is dry.
Time for mascara #2! Again, picking the second mascara is very different than mascara #1, that will be in the follow up post. This mascara is NARS Audacious Mascara, which they recently sent me and I’ll have a review soon.
With mascara #2 I mostly concentrate on getting the mascara along the length of the lash, I don’t need to worry about the base. Because the 2nd mascara doesn’t have as many bristles in the brush, I can just sweep it from mid-length to the ends.
Finally, I apply a little mascara to the lower lash. This isn’t an every day thing for me, if I’m tired and having extra bag/circle issues in particular it’s a bad idea because any smudged mascara will make the whole area look worse. So, on days that I want mascara on my lower lash line, I grab that first mascara again. I just rub it side to side at the very base of the lashes, just barely applying product to the lashes. I want a little definition on my lower lash line and primarily at the lash base, covering the full lash length isn’t important on the bottom.
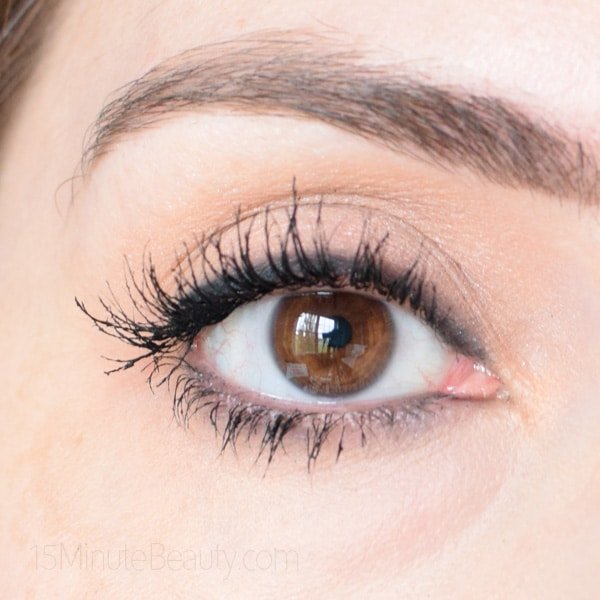
Here’s the final result! Long lashes that look great, without false eyelashes. I get compliments from friends, family, and even strangers in the produce section. I had my hair done at a new salon last week and had 3 discussions about my mascara while I was there. Really. Have you tried layering 2 different mascaras yet?
Read more about mascara, mascara primers and lashes in my Mascara and Lashes Guide
Product Sent for Review, I Bought It, Affiliate Links
The NARS was sent by PR (and I’ll be repurchasing it!), I bought everything else.

 I’m a doctor, a mommy and a bit of a beauty addict. If you let me, I can take 2 hours to get ready in the morning. Really. I'm on a quest for faster beauty that works!